Let’s say you need to change you ip address because there was a change on the network and now ip settings changed,
you can at anytime request with the command : ‘dhclient‘ a new address to a dhcp server ,
if you only have a single network adapter, the command is very simple
just launch the command
to release the address currently associated to you
then just launch
and you computer will broadcast a dhcp request
if you have multiple adapter ,
you can do
dhclient wlan0[/code]
to spécify that you want a new ip address for you wlan0 adapter
by default the command dhclient is silent , meaning that you will not get any information about what the dhcp server answered.
to add verbosity to the command , just add a -v parameter
orange pi is an awesome sbc manufacturer known for excellent hardware and awful software support.
I’m a very happy owner of the first generation orangepi zero witch I use as a headless Linux server on my network.
Today orangepi release a new version of the orange pi zero called the “orange pi zero 2 plus” the cpu goes from the H2+ to the H3, the wlan controller is better, you get a csi camera interface. And 8gb onboard mmc flash.
Also the board gain an hdmi port witch enable easy video output to a screen or a TV.
The board also gain bluetooth support if that something that’s useful to you.
Overall its seems the addition of the hdmi port is at the expense of the disappearance of the ethernet port witch was for me one of the best feature of the first edition of the orange pi zero.
The board is made for a different purpose, the 2 plus is going to be ideal for a very small media player or a emulator gaming device. Since the video output and the 4k capability are adding this kind of possibilities
The board is also much more expensive than its predecessor at 18$90 compared to the original 512MB orange pi zero at 8$99.
Since I don’t require a video output the original orangepi zero suits better my purpose, but for most people a video output is mandatory,
The orange pi zero 2 plus is going to be be an excellent board once the armbian team release an image for it.
if you need to know what devices are currently connected on the same network as you ,
there is no very simple way ,
you could use the command arp -a to see your arp table but it’s not always up to date and can have false entries.
using the broadcast option is never working for me , nmap is slow and only show the results when the scan il finished and it’s not installed by default on most distrib.
Most ping loop to cycle through all available address on the network are going to deal with the high minimum timeout time of 1 second before trying the next address.
the Best solution is to launch the ping command in parallel , you could use xarg -P to do that , but xargs is not present on lightweight linux distribs like OpenWRT.
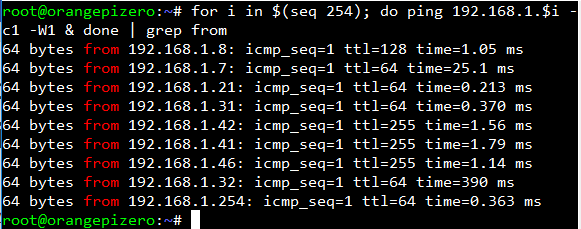
using that command , you will launch in parallel 255 time the program ping , ping an address from 192.168.1.1 to 192.168.1.254 with only one paquet and a timeout of 1 second.
the answer you will get will look like that
this loop use only very simple commands included in most linux operating systems
If you need a convenient way to store the date in a database you will certainly use the unix format.
it’s very convenient because it doesn’t change notation from country to country.
You can later convert it back to a format that’s human readable.
in a shell on linux if you wish to display the current unix time. just type
date +%s
But if you need the unix time for a specific date ,
date –d=’03/14/2016 00:00:01′ +%s or date –d=’14 march 2016 00:00:01′ +%s
There is also the function to input an interval
date –d ‘1 hour ago’ +%s date –d ‘1 month ago’ +%s
Sometime when you grep a file on Linux you need to not only display the line where the result is found but also several lines before or after the match.
Grep as a useful function permitting you to do just that.
Let’s take an example file.
file.txt:
Title : login issue
Ticket number : 16417
Details : user password is no longer working.
Title : Broken keyboard
Ticket number : 16418
Details : the space key on the user keyboard no longer work
If the file is list of hundreds of this informations and you need to see only the information related to ticket 16417 you need to
cat file.txt|grep 16417
Will only return the result Ticket number : 16417 living out the useful informations
If you need to display a line after the grep match
cat file.txt| grep -A1 16417
will return :
Ticket number : 16417
Details : user password is no longer working.
But there is also useful information before the match
You can associate the 2 options to display the line after and before
cat file.txt| grep -A1 -B1 16417
this will return all the information i need :
Title : login issue
Ticket number : 16417
Details : user password is no longer working.
On linux you have the ability to mount network share as they were part of your local storage ,
On debian , you need to have a package named cifs-utils specialised to mount network share.
after installation of the package using the command :
apt-get install cifs-utils
You have to create a folder to attach the mount to
mkdir /media/netshare
mount -t cifs "//host-of-the-share/disk/" /media/netshare -o guest,iocharset=utf8,file_mode=0777,dir_mode=0777
if you have to identify yourself to use the network share the command is slightly different :
mount -t cifs "//host-of-the-share/disk/" /media/netshare -o user=username,iocharset=utf8,file_mode=0777,dir_mode=0777
the system should ask you for your password
to check if you mount was successfull , you can check the mount using
If you run a linux server with with a ssh service on the TCP port 22 , you are likely to get bombarded by automated login attempt by hundreds and hundreds of bots
You can look at the file getting created by launching
tail -f /var/log/auth.log | grep Failed
the first thing you can do to stop that is to change the default port user by the SSH service on you linux server
for this you just have to edit the config file : /etc/ssh/sshd_config
Find the following lines
# What ports, IPs and protocols we listen for
Port 22
And put the new port on which you would like to run your OpenSSH server.
After this little change restart the ssh service with the command
service ssh restart
You should see that the numerous and constant attacks sould instantly stop.
After installing my orange pi zero. I tried to use my board the reencode some video file that use xvid/ac3 to x264/aac with the ffmpeg linux command.
The problem was that it took more than two hours at 100% cpu usage on the 4 cores to reencode the video, during that time the cpu was getting instantly too hot and, as a result, was heavily throttling . I tried to use a radiator, and it significantly reduced the amount of throttling but it was not eliminating it, since eventually the cpu reached pretty high temperature.
I decided to add a fan to blow on the radiator to reduce even further the cpu temperature.
I didn’t want the fan to be running all the time so I decided to use the gpio function of my board to control the state of a pin to start and stop a fan.
The problem is that the logic levels sent by the gpio is 3.3v which is much to low to start the fan i own.
My fan is a 12v fan, but it turns out that it can run at 5v, it just have a lot of trouble starting, most of the time when I put 5 v on the fan, I just see a very small movement, and then nothing, I just have to give a little push, and then it will start
Of course, this is not going to be OK. I must find a way to start that fan without that initial push.
To send 5v instead of 3.3v to the fan I used a PNP transistor that will be controlled by the 3.3v signal.
As you can see on the photo, the pin one of the PNP transistor is wired to a GPIO pin, the pin 2 is wired to the pin 2 of the board which provide constant 5v,and then the pin 3 is wired to the the red wire of the fan.
The black fan wire is connected to the pin number 6 of the board.
Here is a little schematic of the wiring.
To control the gpio I used wiringpiprogram that I found at this URL
At first I tried to use the gpio pin number 23 but, for some reason I failed to change the state of that pin using the wiring pi library.
I then chosed to use the pin number 7 which is named GPIO.7 in the “gpio readall” command.
First I configured the pin 7 as an output using that command
gpio mode 7 out
Then i use that command to set pin 7 at logic level 1 (3.3v)
gpio write 7 1
But even with all that, my fan still needed a little push to start turning.
After a good afternoon where I considered buying a cheap and small 5v fan on one of the classic Chinese website, i remarked that if my control GPIO pin was not soldered and I disconnected and reconnected very rapidly the control wire, the fan was starting every time.
The idea of a bash script exploiting this fact was born.
Here is the script that works for me every time!
#!/bin/bash
gpio mode 7 out
i=0
while (($i < 10))
do
gpio write 7 1
sleep .1
gpio write 7 0
sleep .05
i=$(($i+1))
echo $i
done
gpio write 7 1
This script put the pin 7 in output mode, then switch the state of pin 7 rapidly provoking the startup of the fan. At the end of the script the pin 7 is left in the 1 state.
To be sure the fan started, I usually launch this script 3 times, but it’s overkill and one time is enough most of the time.
When I want to stop the fan, I just launch the command
gpio write 7 0
And the fan stop immediately,
Now creating a script that launch automatically the fan when the cpu get above a predefined temperature is going to be extremely easy, I will describe it in another article.
Even if the fan is turning very very slowly , it does have a very significant effect on cpu temperature