Author: Fabien

Passing argument to a curl downloaded script

To add an argument to the execution of the script you’re downloading and running via curl, you can modify the command like this:

curl http://aaa.com/script.sh | sh -s -- scan
  • sh -s : This tells sh to accept input from stdin (which comes from curl via the pipe |).
  • : This marks the end of options for sh. Everything that follows will be considered arguments for the script.
  • scan : This is the argument you want to pass to the script

You can add other arguments by separating them with spaces after “scan” if needed.

This method allows you to execute the downloaded script with arguments, just as if you were running it directly on your system.

BASH | Hex to Decimal Conversion

To convert a hexadecimal value to decimal using Bash, you can use either the printf command or bc. Here’s how to do it with printf:

printf "%d\n" 0x3000

This will output the decimal value corresponding to 0x3000.

Alternatively, using bc:

echo "ibase=16; 3000" | bc

This interprets 3000 as a hexadecimal value (base 16) and converts it to decimal.

In both cases, the result will be 12288.

Using VI to insert spaces at the begining of every line

In the Vi text editor, you can insert two spaces at the beginning of each line using a command called “substitution.” Here’s how you can do it:

when in vi with your text displayed :

Press the Esc key to ensure you’re in command mode.

Enter the following command to perform the substitution:

:%s/^/  /

Press the Enter key to execute the substitution command.

Explanation of the command:

%s indicates that the substitution should be done throughout the entire file.
^ represents the beginning of each line.
/ is the space you want to insert at the beginning of each line. Make sure to type two spaces.


Now, each line in the file should start with two spaces. You can verify this by scrolling through the file or using other search and navigation commands in Vi.

JSON text filtering with jq

I frequently have to intereact with some json files , since bash is the main tool i use day to day i must master the usage of jq, but i noticed that the vast majority of totorials on jq usage just sucks.
I’m going to write some kind of memo to remember the main command that i use most of the time
lets take this dummy contact.json file

{
  "contacts": [
    {
      "name": "John Smith",
      "phone": "(123) 456-7890",
      "email": "john.smith@example.com",
      "sex": "male",
      "position": "Manager",
      "birthday": "1985-06-23",
      "devices": [
        {
          "type": "laptop",
          "model": "MacBook Pro",
          "serial_number": "ABCD1234",
          "issued_date": "2022-01-15"
        },
        {
          "type": "phone",
          "model": "iPhone 12",
          "serial_number": "EFGH5678",
          "issued_date": "2022-01-15"
        }
      ]
    },
    {
      "name": "Jane Doe",
      "phone": "(234) 567-8901",
      "email": "jane.doe@example.com",
      "sex": "female",
      "position": "Sales Representative",
      "birthday": "1990-02-14",
      "devices": [
        {
          "type": "laptop",
          "model": "Dell XPS 13",
          "serial_number": "IJKL9012",
          "issued_date": "2022-03-01"
        }
      ]
    },
    {
      "name": "Bob Johnson",
      "phone": "(345) 678-9012",
      "email": "bob.johnson@example.com",
      "sex": "male",
      "position": "IT Specialist",
      "birthday": "1982-11-30",
      "devices": [
        {
          "type": "laptop",
          "model": "ThinkPad X1 Carbon",
          "serial_number": "MNOP3456",
          "issued_date": "2022-02-10"
        },
        {
          "type": "phone",
          "model": "Samsung Galaxy S21",
          "serial_number": "QRST7890",
          "issued_date": "2022-02-10"
        }
      ]
    }
  ]
}

to list the name of all the male employes in the json file
cat contact.json | jq '.contacts[] | select(.sex=="male") | .name'

this one is truly awesome , display the name of all employes that are more than 35 years old using their birthday.
cat contact.json | jq '.contacts[] | select((.birthday | strptime("%Y-%m-%d") | mktime) <= (now - 35*365*24*60*60)) | .name'

this one is going to list all the phone and their issued date
cat contact.json | jq '.contacts[].devices[] | select(.type=="phone") | {model: .model, issued_date: .issued_date}'

To display the devices issued after 2022-02-12 and their owner’s name, you can use the following jq command:
cat contact.json | jq '.contacts[] | {owner: .name, devices: [.devices[] | select(.issued_date > "2022-02-12") ] } | select(.devices != [])'

ffmpeg : Only keep one language audio track

When downloading movies from the internet, you may notice that some titles include the word “MULTI.” This indicates that the file contains multiple language options.
However, despite the relatively low cost of disk space nowadays, I prefer not to store unnecessary audio tracks that I will never listen to.

That is when the invaluable program named ffmpeg come to the rescue to eliminate these useless tracks.

You can use the following FFmpeg command to keep only the English audio track and copy the rest of the tracks into an MKV file:

ffmpeg -i “in.mkv” -max_muxing_queue_size 1024 -map 0:v -c:v copy -map 0:a:m:language:en -c:a copy -map 0:s? -c:s copy "out.mkv"

Here’s a breakdown of what each part of the command does:

ffmpeg: This is the command that starts the FFmpeg program.
-i “in.mkv”: This specifies the input file, “in.mkv”, that FFmpeg will be working with.
-max_muxing_queue_size 1024: usefull because sometime ffmpeg crash when this is not present.
-map 0:v: This selects the video stream from the input file (stream 0) to include in the output file.
-c:v copy: This copies the video stream from the input file to the output file without any encoding or re-encoding.
-map 0:a:m:language:en: This selects the audio stream from the input file (stream 0), but only if it has the “en” language code. This is useful if there are multiple audio tracks in the input file and you only want to include the English track in the output file.
-c:a copy: This copies the selected audio stream from the input file to the output file without any encoding or re-encoding.
-map 0:s?: This selects any subtitle streams from the input file (stream 0), if they exist. The ? makes the subtitle stream optional, so if there are no subtitles in the input file, this won’t cause an error.
-c:s copy: This copies any selected subtitle streams from the input file to the output file without any encoding or re-encoding.
“out.mkv”: This specifies the output file that FFmpeg will create, “out.mkv”.

There are many language codes available in FFmpeg for selecting audio and subtitle streams based on language. Here are some examples:

English: en
Spanish: es
French: fr
German: de
Italian: it
Portuguese: pt
Russian: ru
Arabic: ar
Chinese: zh
Japanese: ja
Korean: ko
Hindi: hi
Urdu: ur

Using the REST api to read sensors on Home assistant

During one of my little project of making timelapses videos with some IP cameras, I had the following problem : How do you stop capturing new images at night when the camera see nothing,
After all , the sun rise and sun set time are changing everyday ! and i didn’t see a simple way to calculate this.
then i remembered the sun.sun integration in Home assistant.

If i had a simple way to query this integration in my script , i could very simply stop my script when the sun was no longer present in the sky !

The Home assistant REST API

In any home assistant installation there is access to a REST API that lets you do a lot a things , but in my case, I don’t want much , I just want to know if the sun is above or below the horizon.

  1. Get a Authorization: Bearer token
    you first have to generate a token to authenticate your request . You have to go to your user section , this is the circle a the bottom of the toolbar, then at the bottom of the page , you can create a long term token ,
    Please take note of this token because Home assitant can only display it one time , if you loose it , you must recreate an other one.
  2. Then in my script i can use this
  3. it will return either above_horizon or below_horizon, I can then use this in my script to stop the capture when it’s below_horizon

I used jq filter the json result , but , if you can’t or don’t want to install it , you can replace it with this simple awk

Qingping ClearGrass CGDK2 factory reset

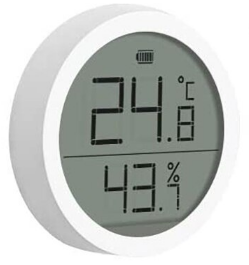
The Qingping Temp & RH Monitor Lite is a cool little BLE device to monitor the temperature inside your home ,

If you are like me , you don’t really like the mihome app and want to use Home Assistant to automate your place.
Unlike the LYWSDCGQ/01ZM the CGDK2 encrypt the message broadcasted , so you can’t just add the device to home assistant and get readings, you need the encryption key or pairing key ,
The problem that I encountered to get that key is that you need to use a modified version of mihome , create a logs folder in the /vevs/ folder in your phone storage , and then, add the device to mihome for the key to be written in /vevs/logs/misc/pairings.txt
in my case , i added the device before creating the logs folder , so i didn’t have the pairing key .
I figured I just needed to delete and re-add the device to mi-home , but it didn’t go that way !
I tried and tried again and all I got was the error standard verification failed (-29).

Since I resolved this issue , I figured I share how i managed to re-add the Qingping Temp & RH Monitor Lite to mi-home .
I needed to do a factory reset on the device .
to do that you need to :
– Keep the pairing button pressed for 8 sec until all the segments of the lcd become black.
– Release the button for 1 sec ,
– Then push the pairing button again for 2 sec ,

The display flash then get back to displaying the temperature as usual, but now you device is factory reseted .
You can now add the device to mihome app and fetch the pairing key in /vevs/logs/misc/pairings.txt

now continue your configuration in home assistant using the Passive BLE Monitor integration

Orange Pi Zero 2 : A new Raspberry Pi contender ?

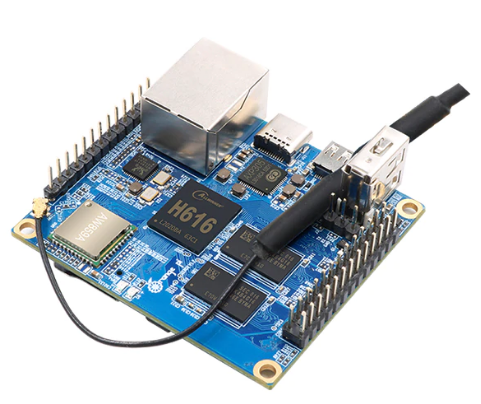
The new Orange Pi Zero 2 Single Board computer

If you were searching for a very small and capable SBC to run some linux app on arm cpu , you were already able to buy the original Orange PI zero ,
but the board has some obvious flaws like .

  • 100mbps ethernet
  • very unreliable wifi
  • no display connector
  • Unreliable power connector (MicroB)

Now after a few years, the company responsible for the original board has created a successor with updated specs.
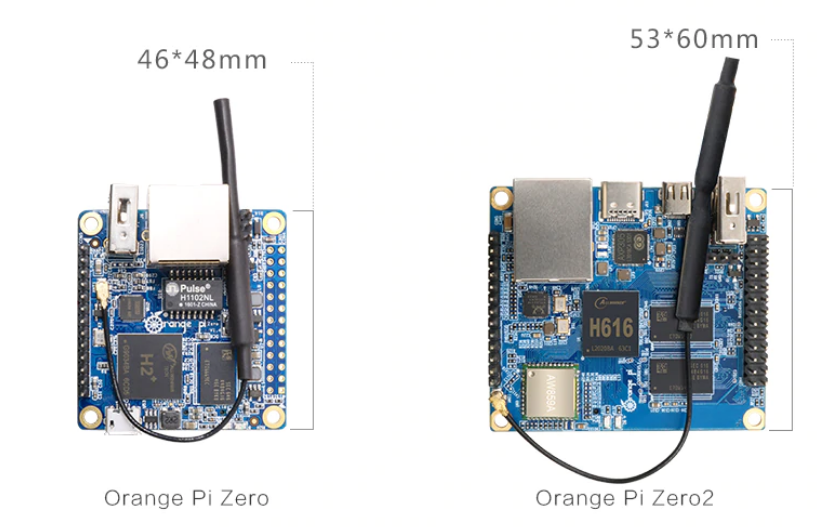
The size of the board is larger than the first , but this is still one of the smallest SBC available on the market at 60 x 53 mm

Bigger than the original OrangePi Zero

Here are the complete specs :

  • SoC – Allwinner H616 64-bit quad-core Arm Cortex-A53 processor @ up to 1.5 GHz with Arm Mali G31 MP2 GPU
  • Memory – 512MB or 1GB DDR3
  • Storage – MicroSD card slot
  • Wired Networking – Gigabit Ethernet
  • Wireless Networking – Dual-band 802.11 b/g/n/ac WiFi 5 + Bluetooth 5.0
  • USB – 1x USB 2.0 host port, 2x USB 2.0 interfaces via 13-pin header
  • 13-pin header with 2x USB, analog stereo audio output, CVBS video output, IR input, 3x GPIOs
  • 26-pin IO header with I2C, SPI, UART, multiple GPIOs
  • Debugging – 3-pin UART header for serial console
  • Power Supply – USB Type-C port 5V
  • Dimensions – (60 x 53 mm)

All this for a board that cost less than 20euros !
looking at the cpu, we have a quad core that might be able to match the performance of a raspberry pi4 but when you look at the cost , it’s more in competition with the Raspberry PI zero W witch has a lot less features than this board and is way less powerful !

I can completely see that board screwed behind a screen and used has an emulation machine .
Or a IP security camera server using MotionEyeOs
Or connected to a ISP router to run pihole (but i would still prefer the original pi zero for this , this one is too powerful for pihole).
Maybe a domotic server like Domoticz or Jeedom , the possibilities are endless !

The main flaw of this new board is the USB port . It’s only a USB2.0 port , and it will limit pretty severely the kind of projects that you can realistically do on this board,
Even if USB2 still has a 300mbps bandwidth. I would choose a board with USB3 to run a server like OpenMediaVault.

you can buy this board here

Using bash and gatttool to get readings from Xiaomi Mijia LYWSD03MMC Temperature Humidity sensor

There is a new inexpensive Temperature and humidity sensor by xiaomi.
This time is no longer round ,

Xiaomi Mijia LYWSD03MMC Bluetooth 4.2 Temperature Humidity sensor

if you like me would like to get the temperature and humidity data from time to time to import in a graphing tool like grafana, there is a simple solution using classic bash tools and gatttool.
First you have to indentify the mac-address of your little sensor, for this , just make sure the sensor is in range of your linux device ans launch a
hcitool lescann

this command will spit out all the bluetooth devices in range
just find the line with the name of the device and copy the mac address A4:C1:38:8C:77:CA LYWSD03MMC

then you must start a little bash script like this :

#!/bin/bash
bt=$(timeout 15 gatttool -b A4:C1:38:8C:77:CA --char-write-req --handle='0x0038' --value="0100" --listen)
if [ -z "$bt" ]
then
echo "The reading failed"
else
echo "Got data"
echo $bt temphexa=$(echo $bt | awk -F ' ' '{print $12$11}'| tr [:lower:] [:upper:] )

humhexa=$(echo $bt | awk -F ' ' '{print $13}'| tr [:lower:] [:upper:])
temperature100=$(echo "ibase=16; $temphexa" | bc)
humidity=$(echo "ibase=16; $humhexa" | bc)
echo "scale=2;$temperature100/100"|bc
echo $humidity
fi

this is a skeleton that you can improve , but for now it pretty much work like that ,

first it use gatttol to connect to the sensor and listen for 15 sec
During these fifteen seconds , you can be pretty much sure to receive at least some data like this :

Characteristic value was written successfully Notification handle = 0x0036 value: 58 03 47 a0 0b Notification handle = 0x0036 value: 55 03 47 a0 0b

this tell me that during the 15 sec of connection i received the information that i need two times.
what i’m after are the value 58 03 for the temperature , and 47 for the humidity.

the temperature is little endian format its mean that the two group must be inverted before decoding the data. i invert the values with awk and decode them using bc.
bc doesn’t like when the hex values are not capitalised so tr is used to do that.

bc then give you the temperature multiplied by 100. relaunch bc to divice per 100,

For the humidity its simpler , you get the value in one step without inverting anyting

Then you can do what you need with theses two vars , insert then in some database etc ..

there is room from improvement: for example this script is not capable of decoding negative temperature.
i will post an improved version when i figure out how to do it

Using a old intel cpu cooler on the raspberry pi 4.

Intel cpu cooler on raspberry pi

The raspberry pi 4 has one of the fastest CPU on a SBC , but it doesn’t come with any cooler ,
The raspberry is indeed capable of running without a cooler , but if you do anything other than idling, or something very lightweight like pihole, you are going to thermal throttle.

Since i have a old intel cpu cooler laying around i figured i could adapt it to cool my raspberry pi.

A old intel cpu cooler without the fan.

the cooler is way to big to be used the way it was designed. so i need to cut the cooler with a metal saw to make a new flat face , and put part of the cooler on the raspberry pi CPU.

sawing the intel cooler in two parts

after cutting the cooler you can see that i was far from having a flat surface to put in contact with the cpu.

To flatten the surface , I used a sanding disc fixed on my drill

After sanding the bumps , I obtained a kind of flat surface ,
i’m aware that it’s not truly flat , so to remedy that fact , i putted some thermal paste on the cpu surface.
The thermal compound will fill any irregularities enabling a good contact between the cpu and cooler.

Intel cpu cooler on raspberry pi
raspberry with cooler installed

Then to maintain the cooler flat on the cpu surface , i added a rubber band around the raspberry .
It will help put pressure on the radiator keeping it well pressed on the raspberry cpu

With this cooler the idle temp is aroud 50c and jump to 65c under load (ffmepg encoding)
The thermal throttling temperature of 85c is nevec reached